There it is, a perfect photograph! There’s only one thing wrong with it, though—the background. Something or someone in the back is ruining the atmosphere, so you want to delete it. Most Photoshop professionals can do that in the blink of an eye.
Unfortunately, we’re not all photography pros. However, with some patience and will, anyone can learn how to remove the background from an image in Photoshop. We present our five favorite methods and bonus tips for creating a perfect backdrop.
In this article
Method 1: How to Remove a Background in Photoshop Using Object Selection
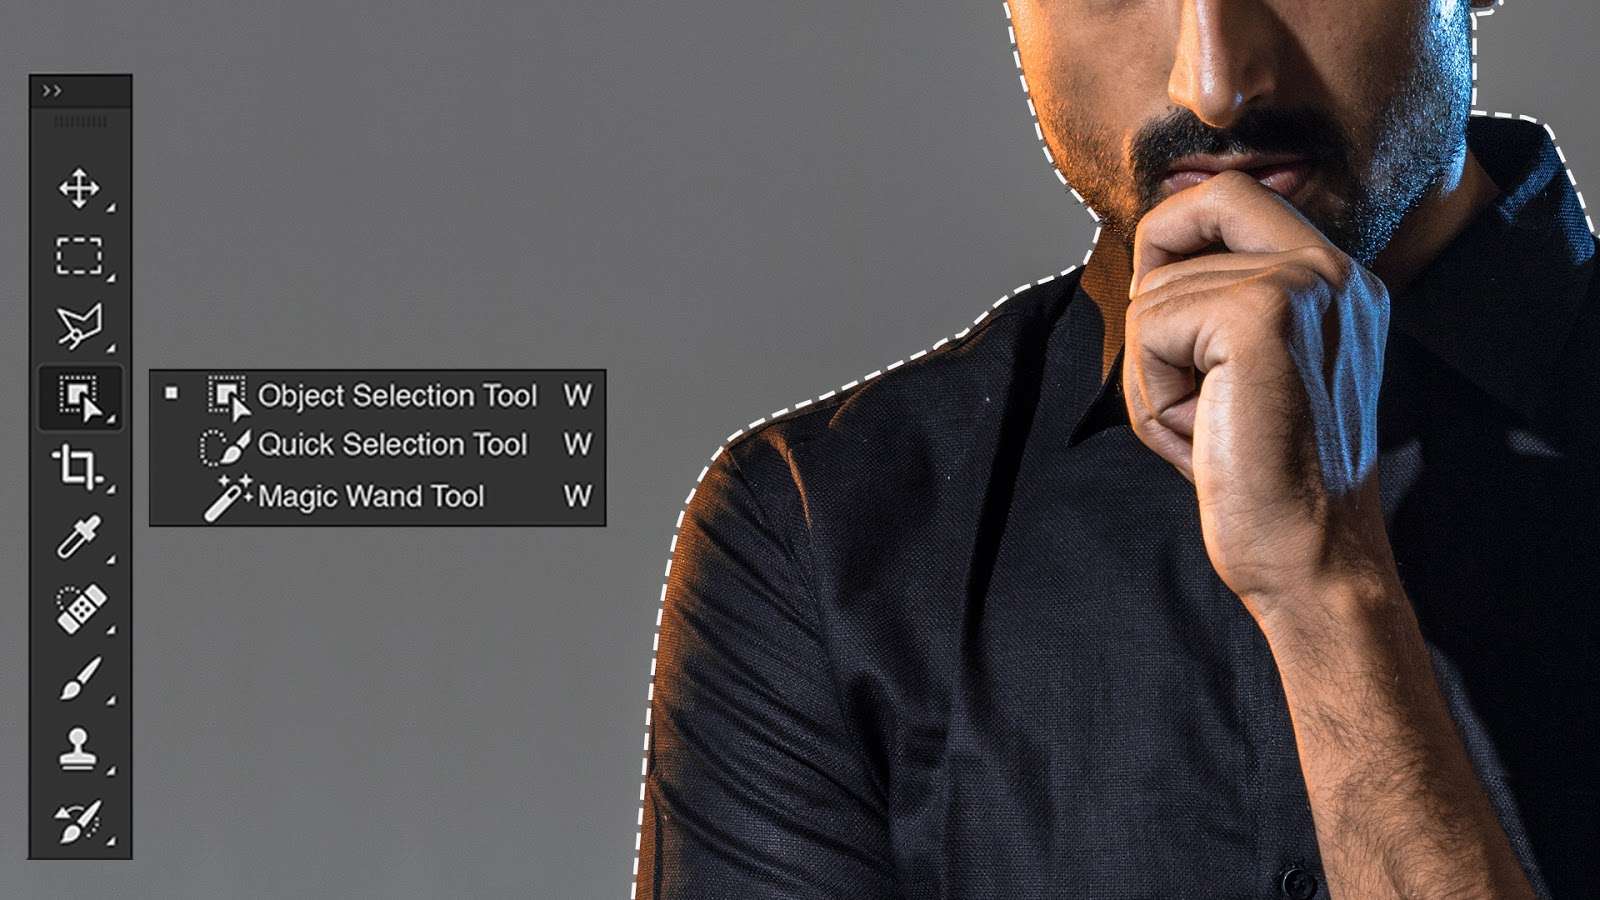
The Object Selection tool has been a part of the Photoshop suite for a while, but it only recently became suitable for amateurs and beginners. Object Selection was hugely manual in older versions, and you had to add or deselect objects by yourself.
First introduced in 2022, the new Object Finder feature harnesses the power of AI to help you select subjects with greater precision. Maybe you already realize it, but object selection is crucial for removing a background from any photograph.
Obviously, you need Photoshop 2022 or newer for that. Do you need advanced editing skills as well? Thanks to the AI, the answer is no. Here’s how easy it is:
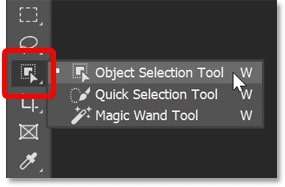
- Step 1: After you’ve opened your photo in Photoshop (if this is your first time using Adobe’s classic, just choose File > Open), find the Object Selection tool in the Photoshop Toolbox (the menu on the left). It’s under the third icon, right beneath the Lasso.
- Step 2: You’ll find the new Object Finder feature in the Options Bar above the canvas. Check to ensure it’s on.

- Step 3: When the Object Finder is on, Photoshop automatically looks for objects in your photo. You can see them by clicking the Show All Objects icon next to the Refresh button in the Options Bar.

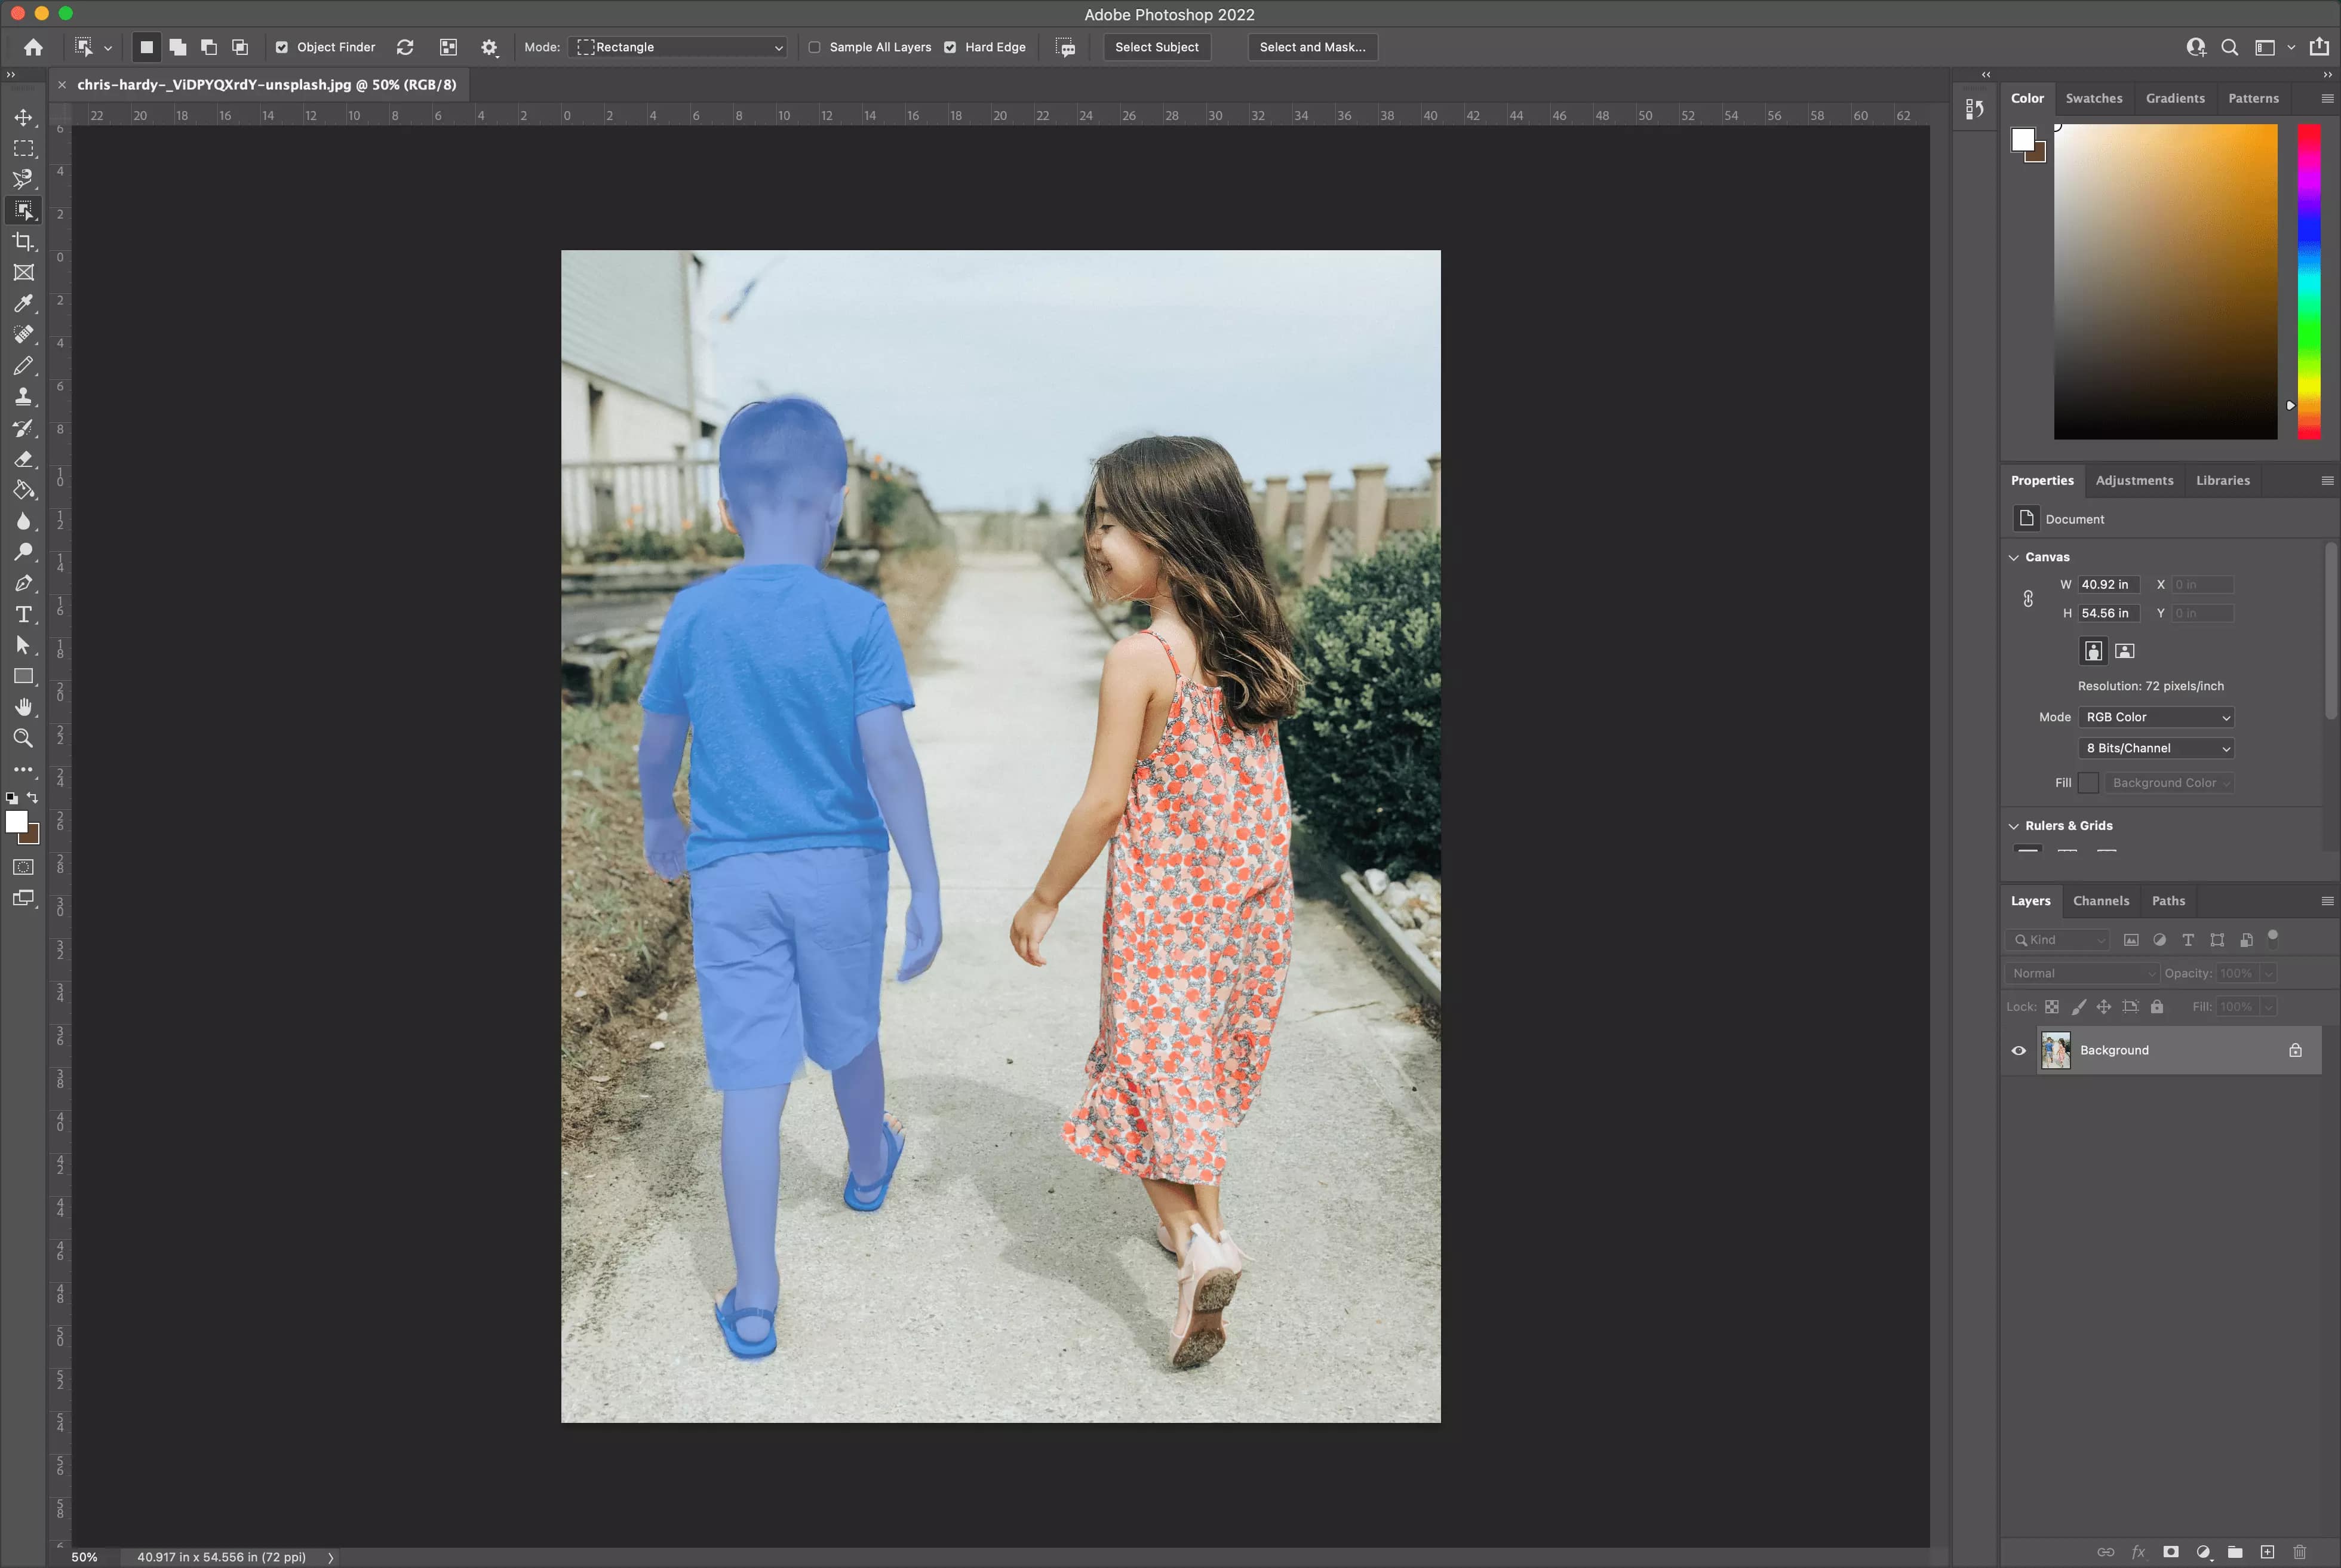
- Step 4: If you’re unsatisfied with the Object Finder’s results, you can still select the objects manually. Using your mouse, simply hover over one until it turns blue.
- Step 5: If you have multiple objects you want to keep in the photo after removing the background, you need to hold the Shift key while selecting additional objects.
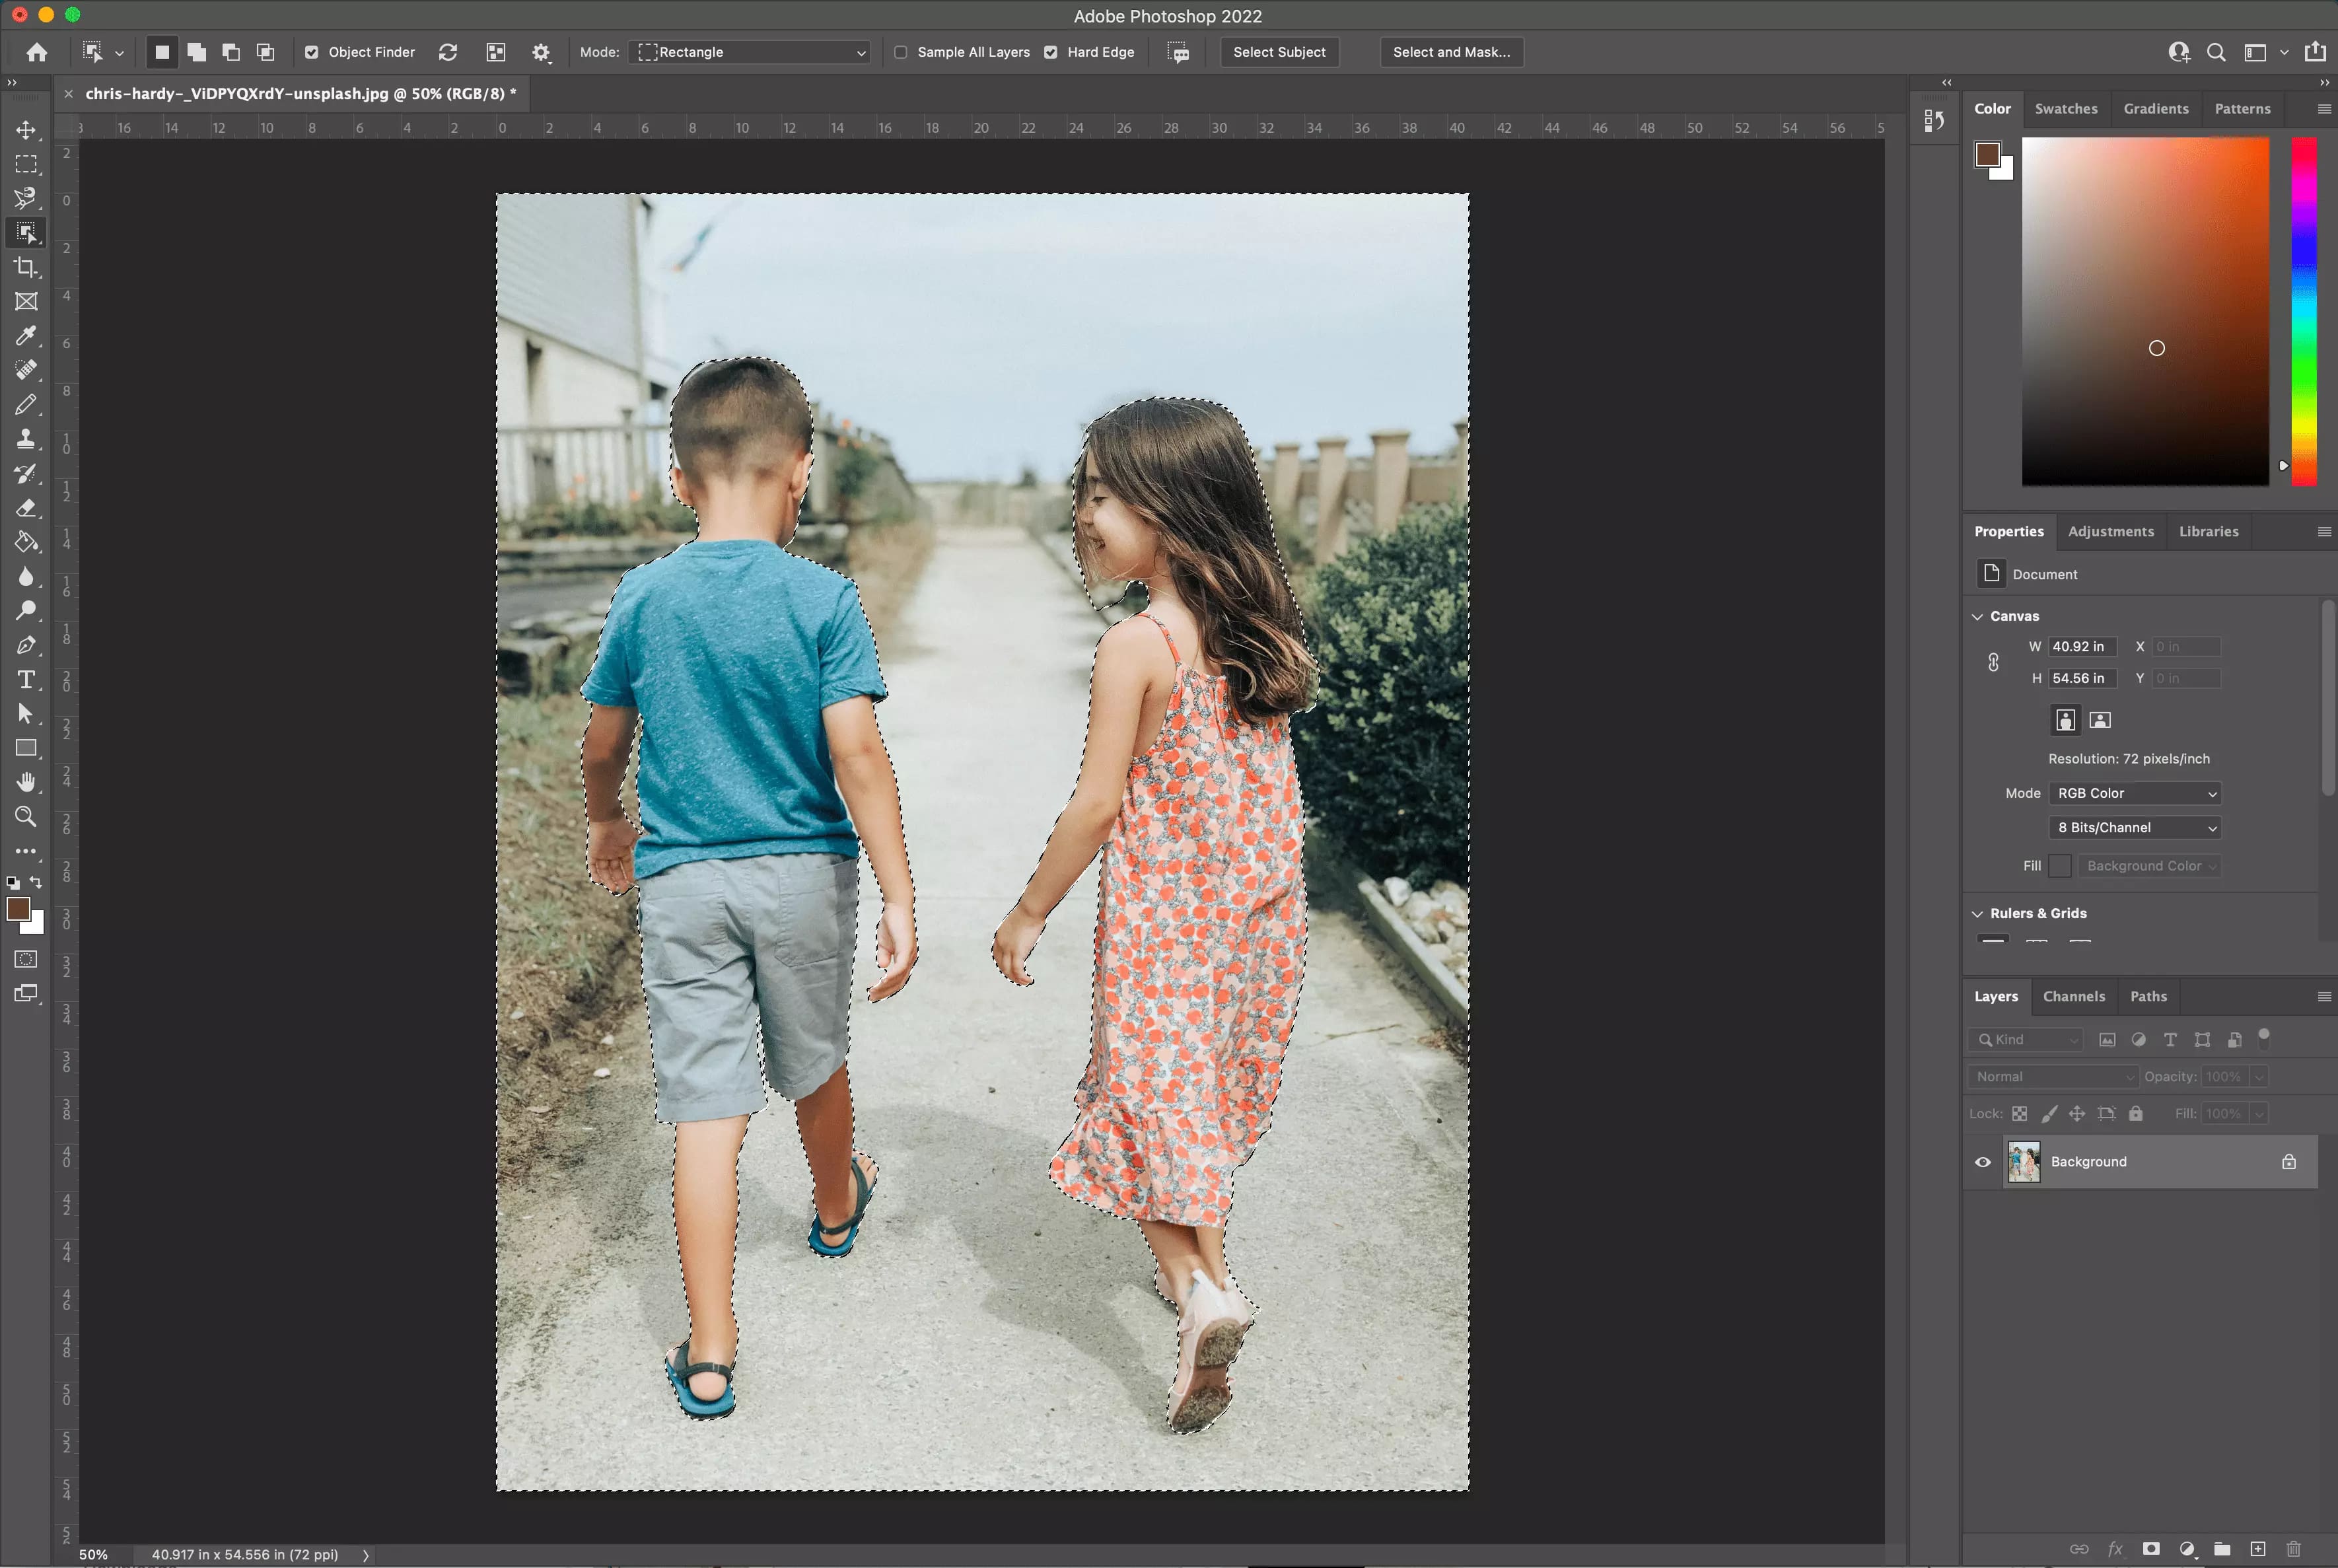
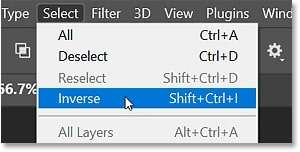
- Step 6: If every object you want to keep is selected, go to the Menu Bar at the top of the screen and click Select > Inverse. That will inverse the selection from the objects to the background.
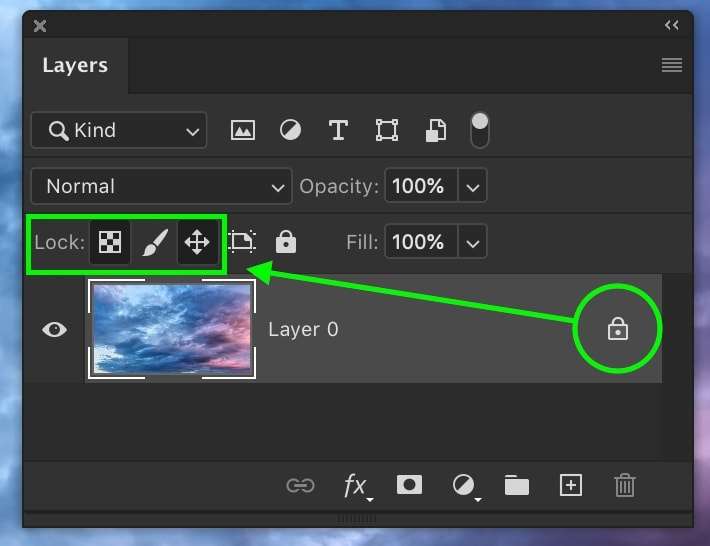
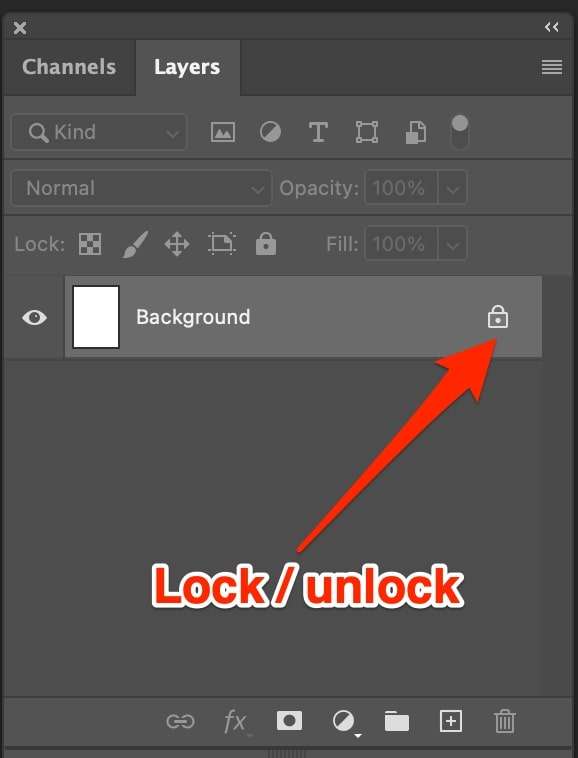
- Step 7: Now, go to the right and click the small lock icon next to the layer name to unlock it.
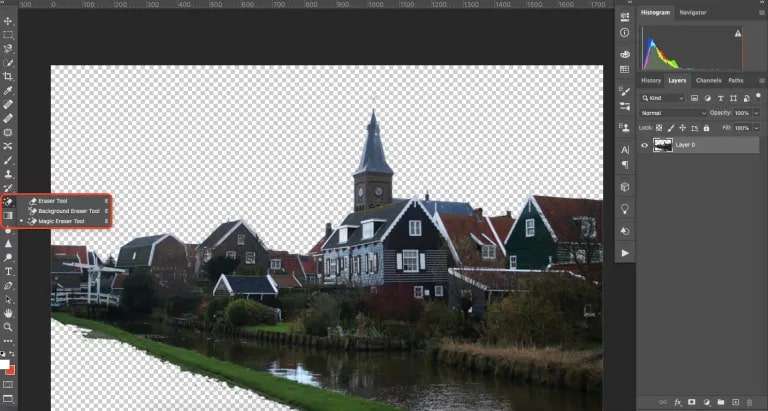
- Step 8: Finally, navigate to the Eraser Tool in the Photoshop Toolbox and start erasing the background in large strokes.
Method 2: Removing a Background in Photoshop Using Quick Action
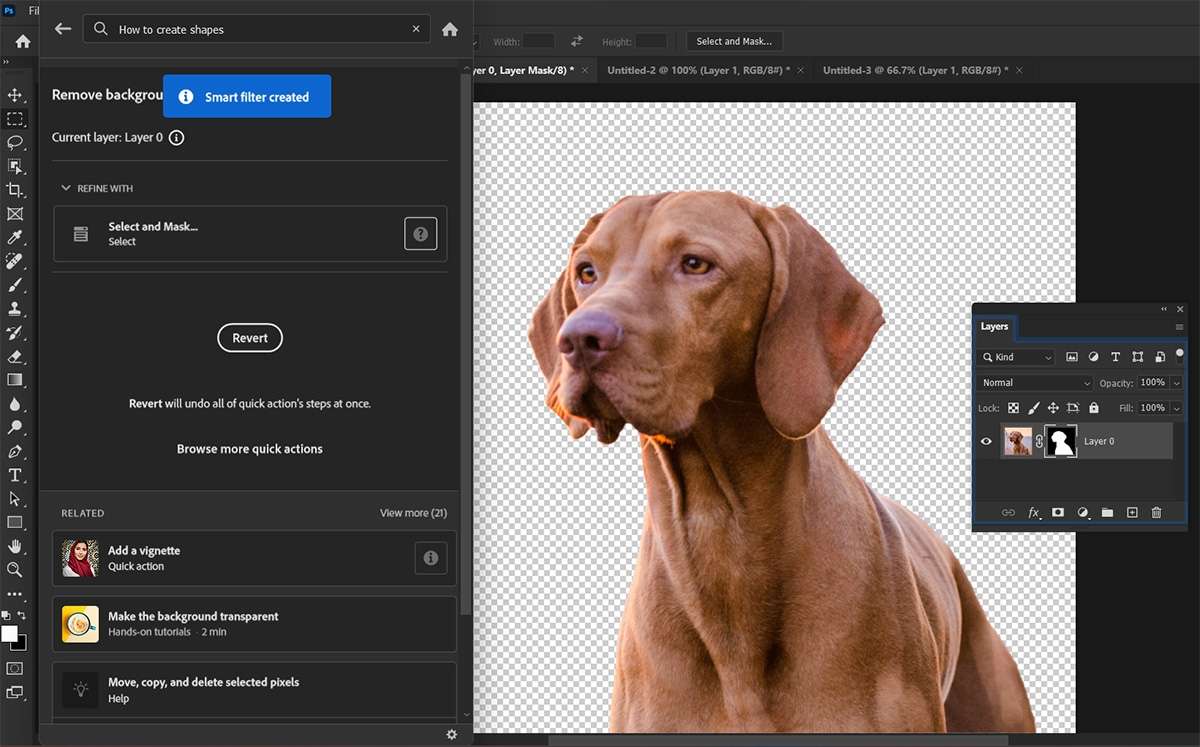
Photoshop Quick Actions are a collection of pre-saved steps for quicker editing. Anyone can access and use them to speed up the post-production process. They are valuable for beginners, as they help skip actions that could be complicated for rookies.
Follow these steps to remove the background with Quick Actions:
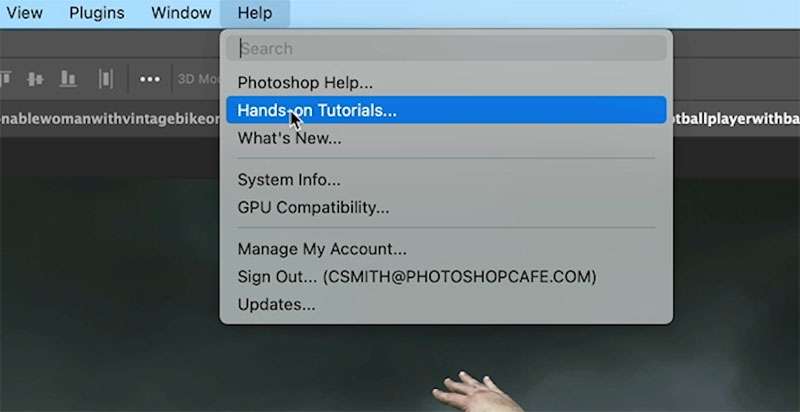
- Step 1: Click the Help Menu > Hands-on Tutorials to access Quick Actions.
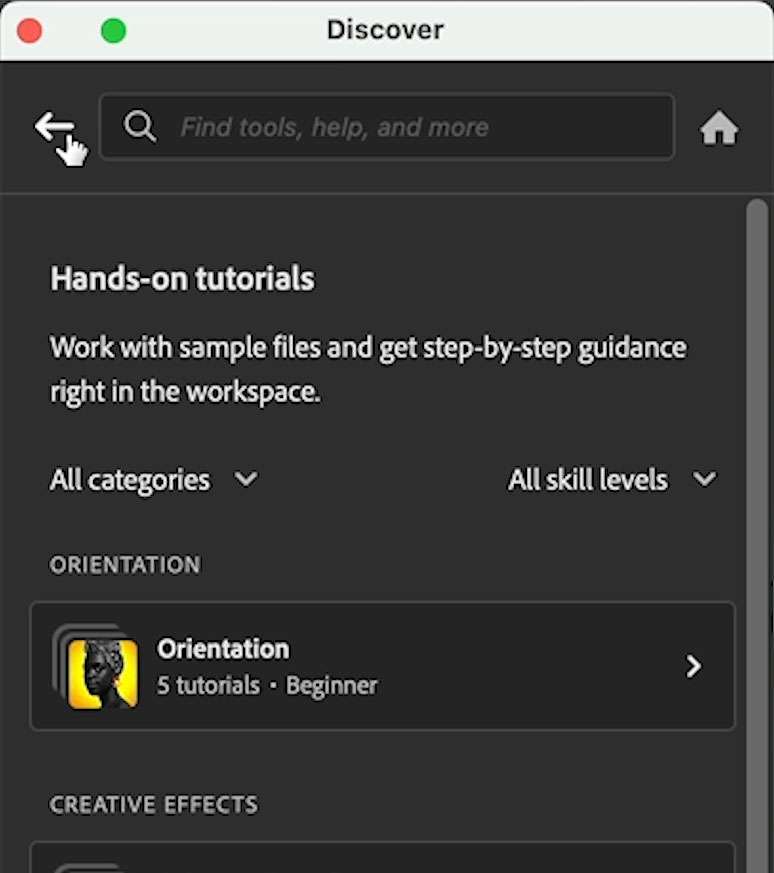
- Step 2: You will see the Discover Panel. Click the back arrow icon next to the search bar.
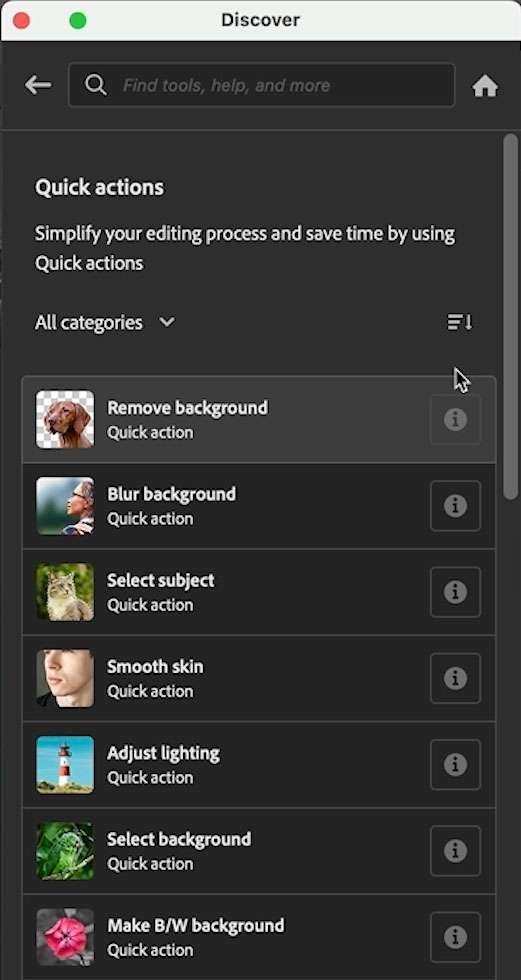
- Step 3: Choose the Remove Background Quick Action.
- Step 4: Open your image in Photoshop and unlock the image layer by clicking the lock icon next to the layer on the right.
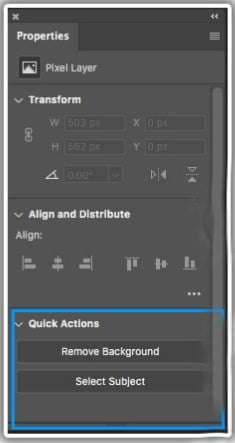
- Step 5: Go to the Menu Bar on the top of the screen and go to Window > Properties. Under Quick Actions, select Remove Background.
Method 3: How to Remove a Background in Photoshop Using the Background Eraser
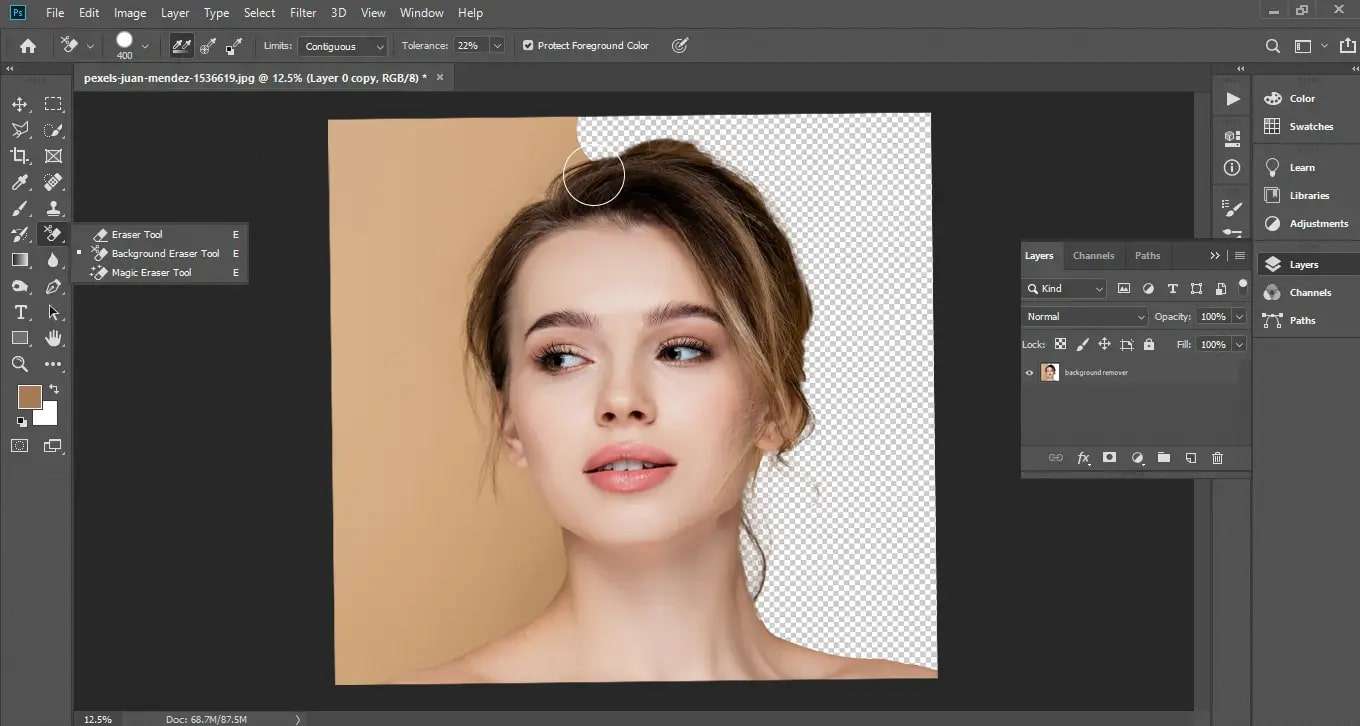
The Background Eraser tool could be of great help in certain situations. Will you be able to use it all the time? Unfortunately, no. Though convenient, this tool is not always precise and can leave out essential details when removing the background in Photoshop.
If you can’t get it right, don't stress about it. More often than not, Background Eraser is frustrating to beginners as it requires a fair amount of fine-tuning. Should you try it anyway? Absolutely! Below, we have included the steps for using Background Eraser:
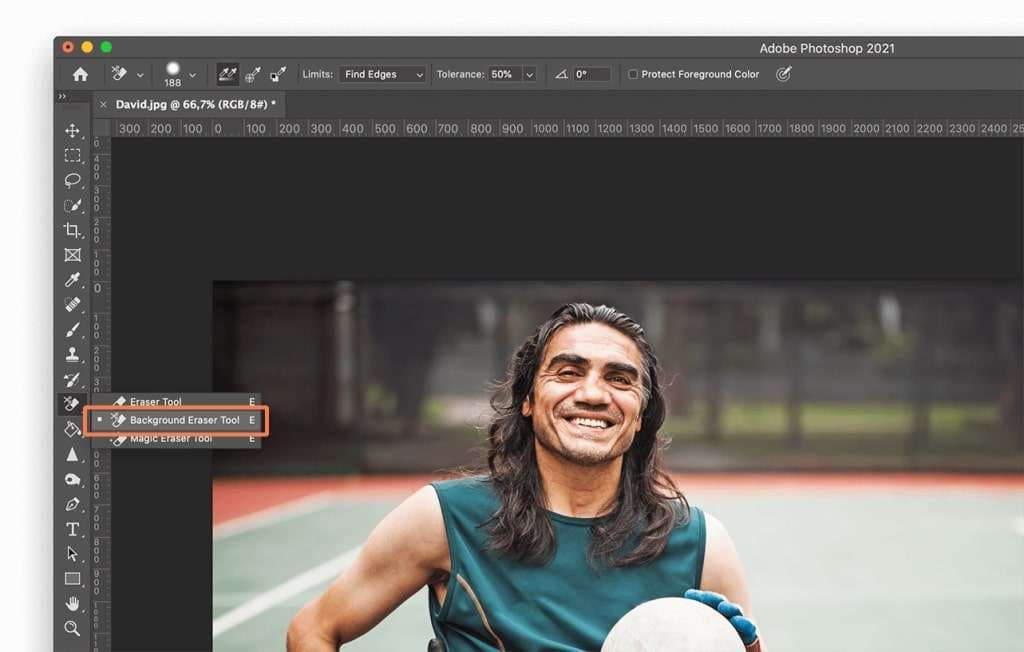
- Step 1: Open your image in Photoshop and navigate to the Photoshop Toolbox on the left. There, you’ll find the Background Eraser Tool, sharing the icon with the Eraser Tool.
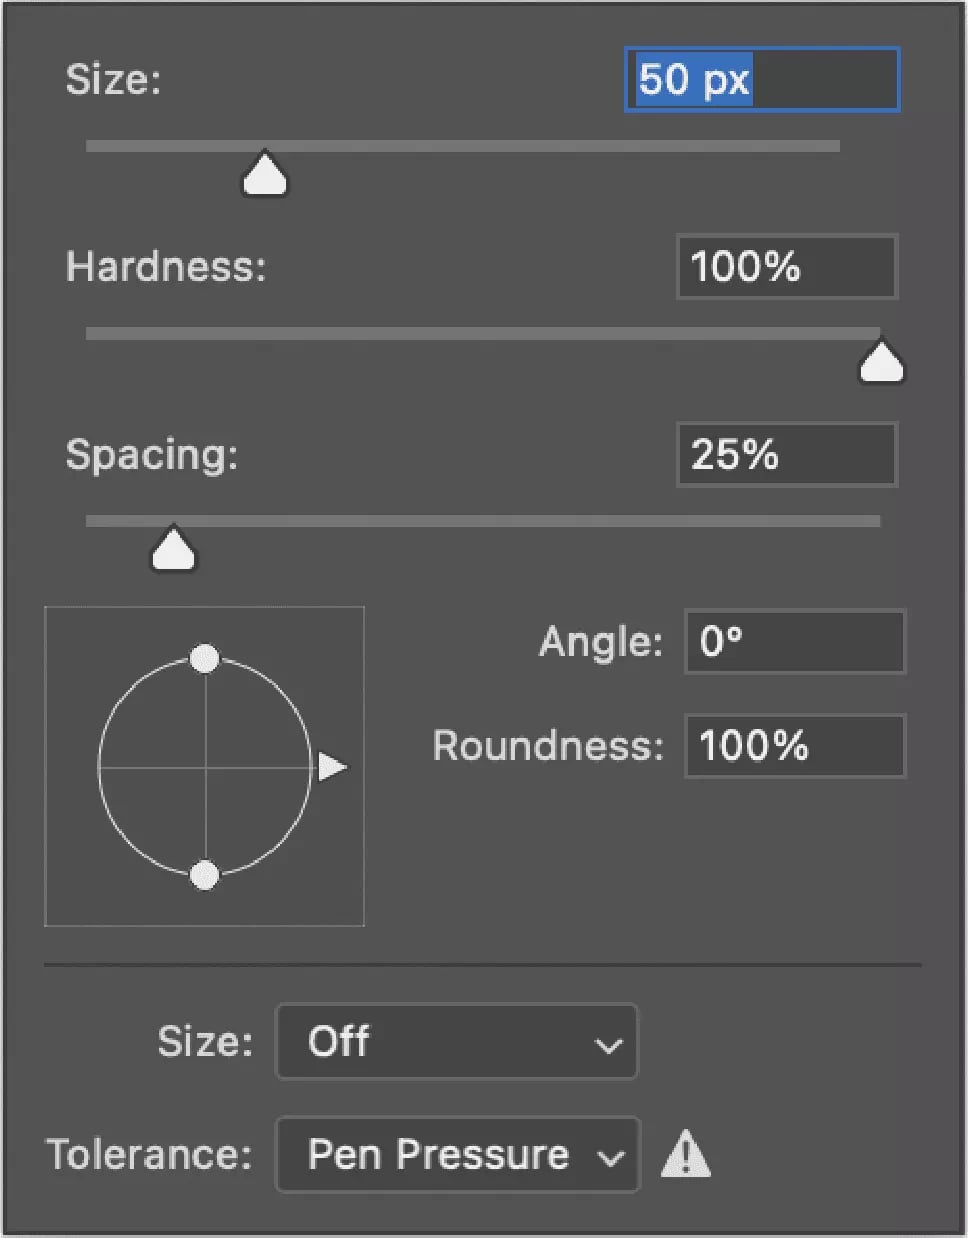
- Step 2: Pick the best size for your brush. Use a broad brush to remove the larger background surface in a few strokes if the image allows. Then, switch to the finer brush and zoom in to erase the background around the objects. Under Hardness, choose 100%.
- Step 3: Go to Limits > Find Edges in the Menu above. While you’re here, set the Sampling to be Continuous. Tolerance should be somewhere between 20–25%.
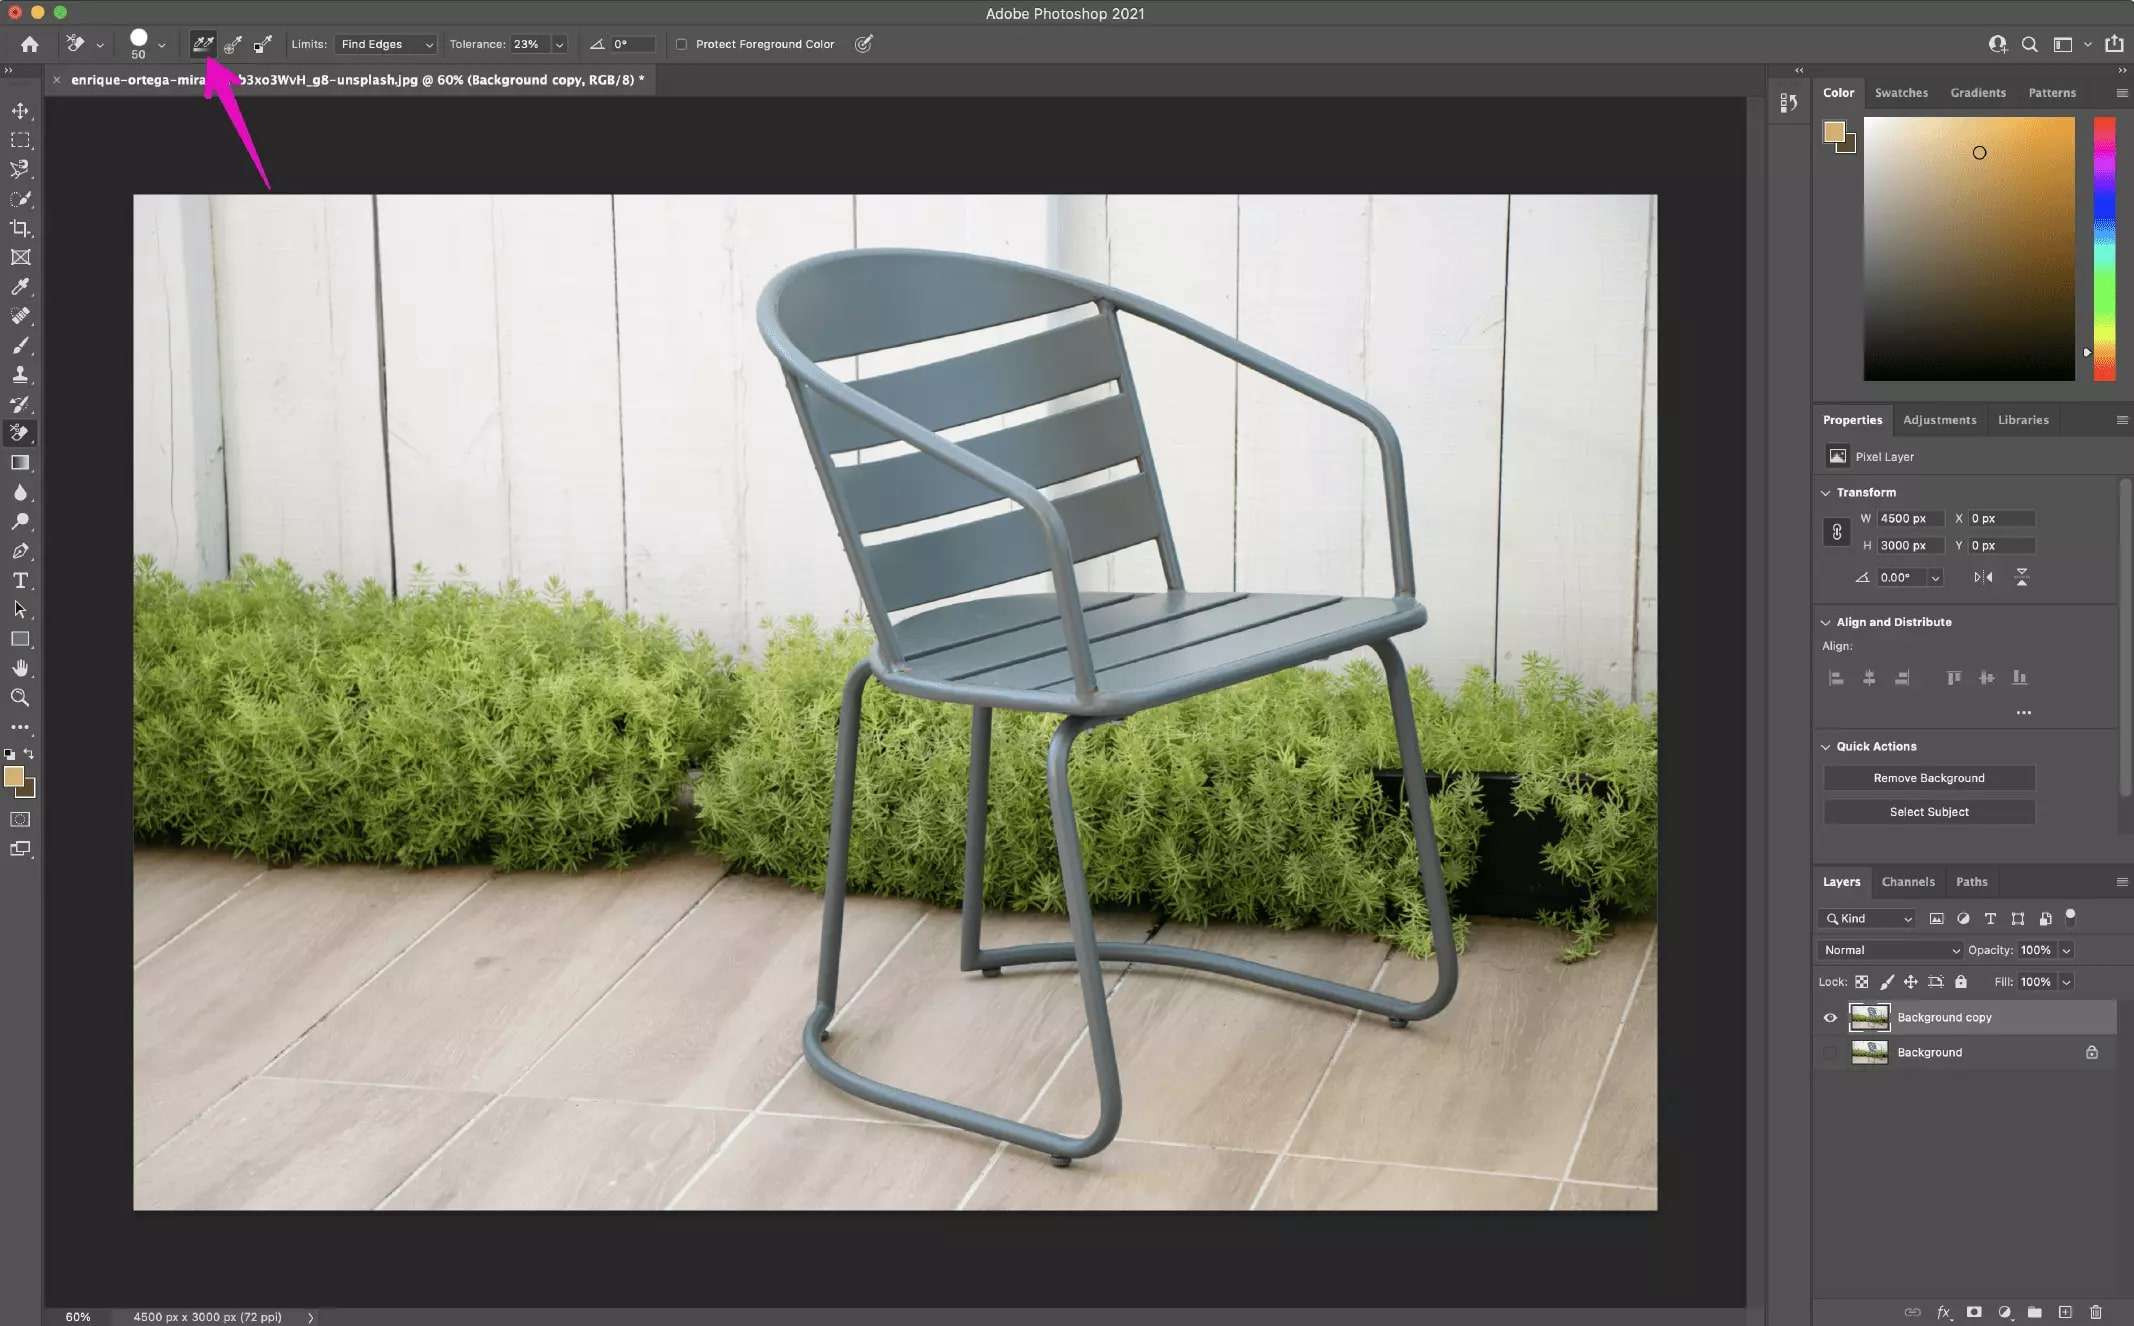
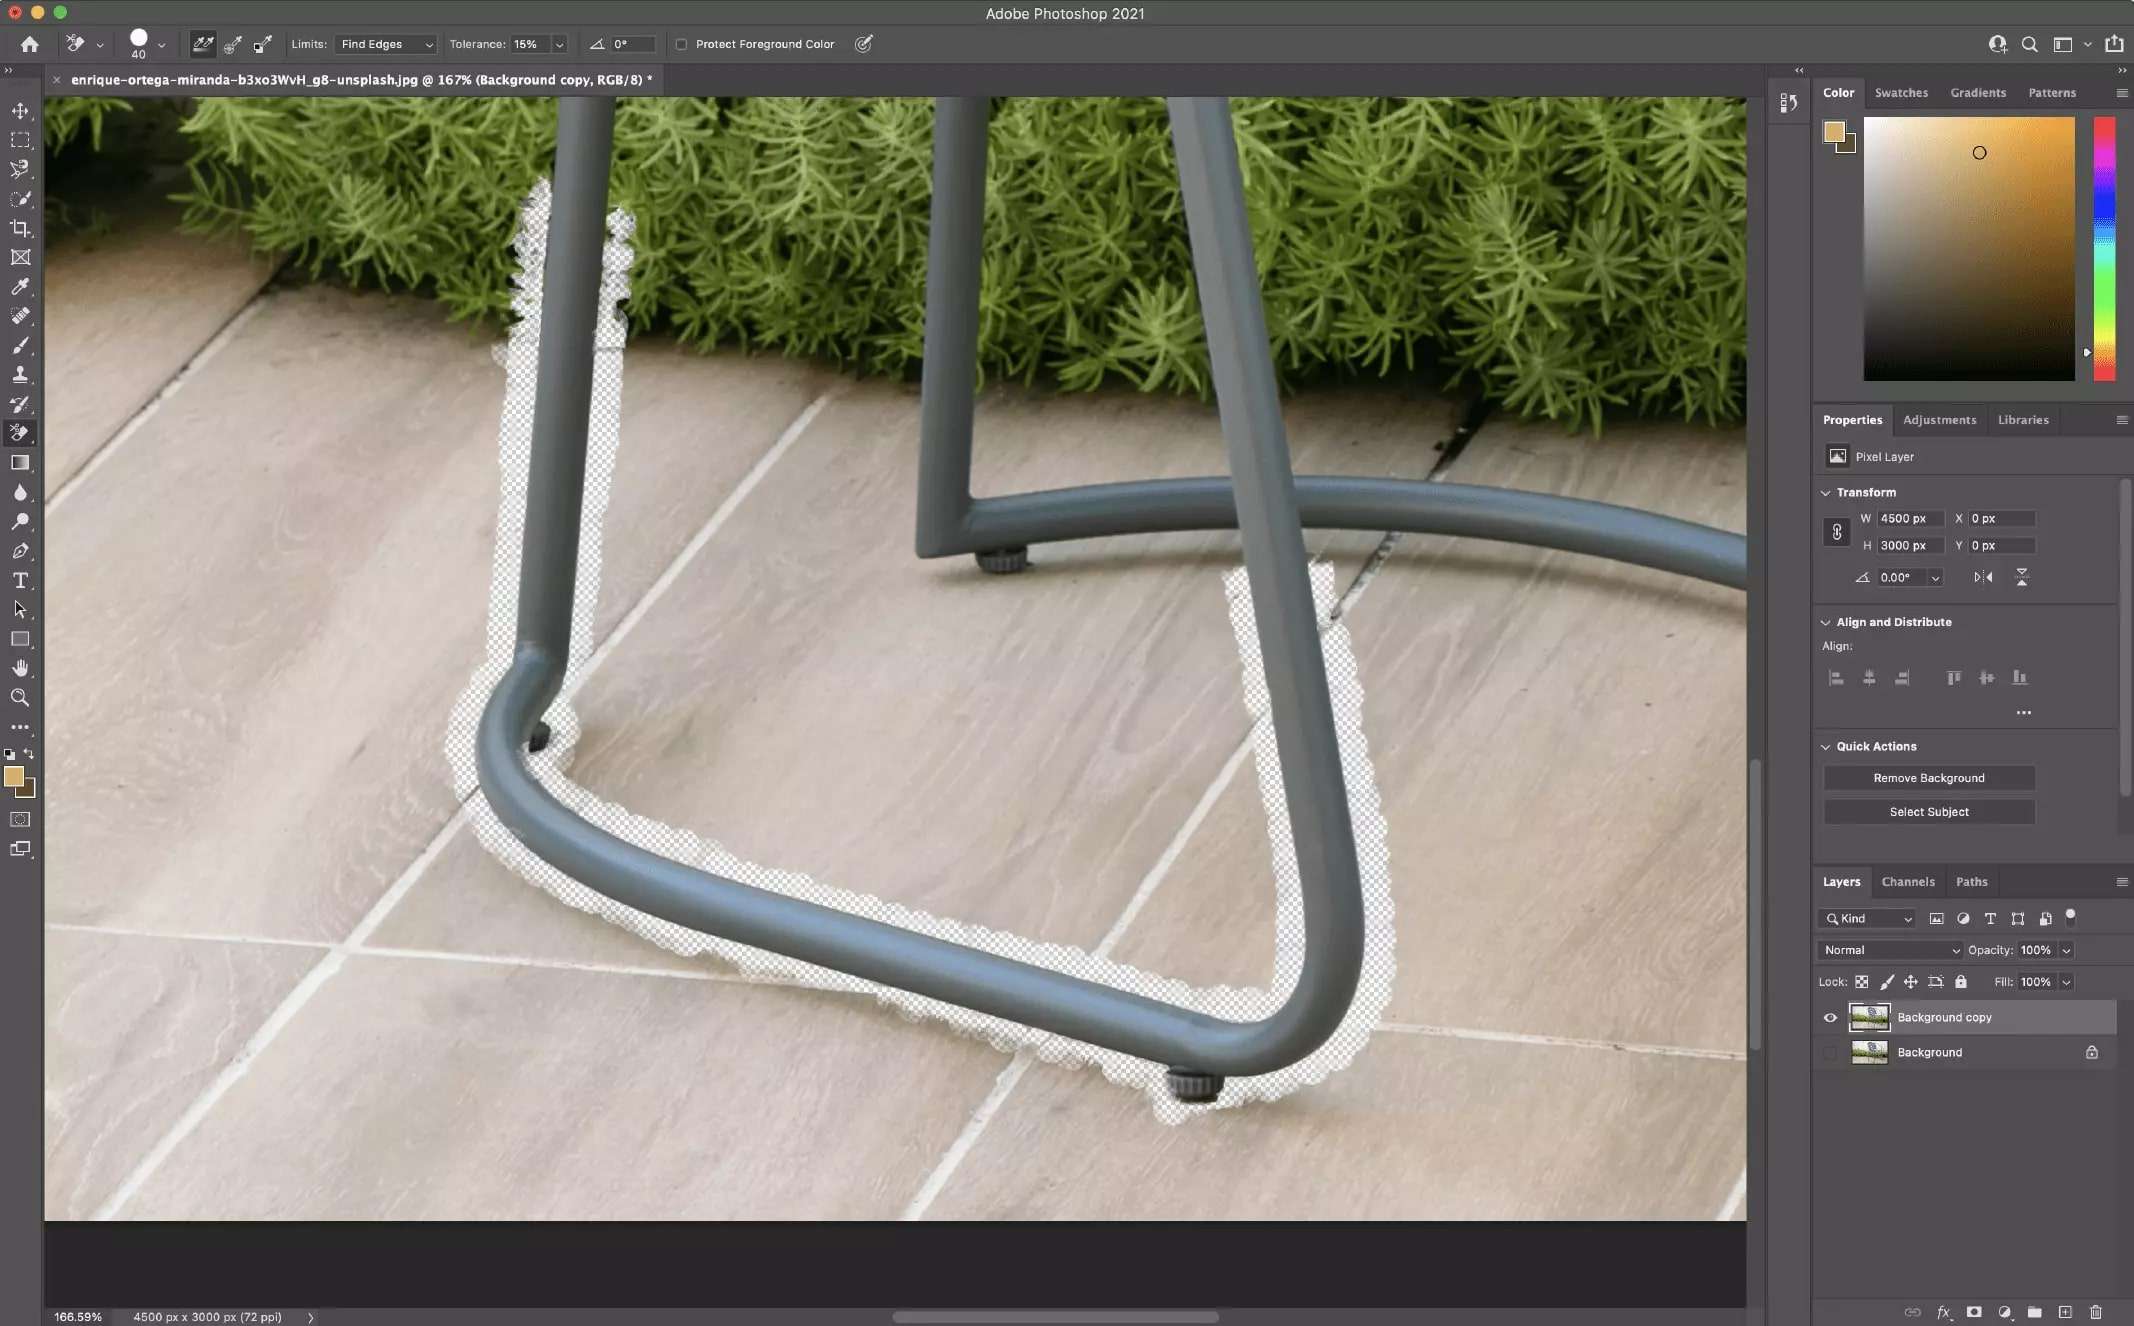
- Step 4: Return to your photo and click and hold while moving the brush around the subject in short strokes. That will take a while, and you might need to readjust the settings and zoom in and out a few times before you’re done.
Method 4: Using the Pen Tool to Remove a Background in Photoshop
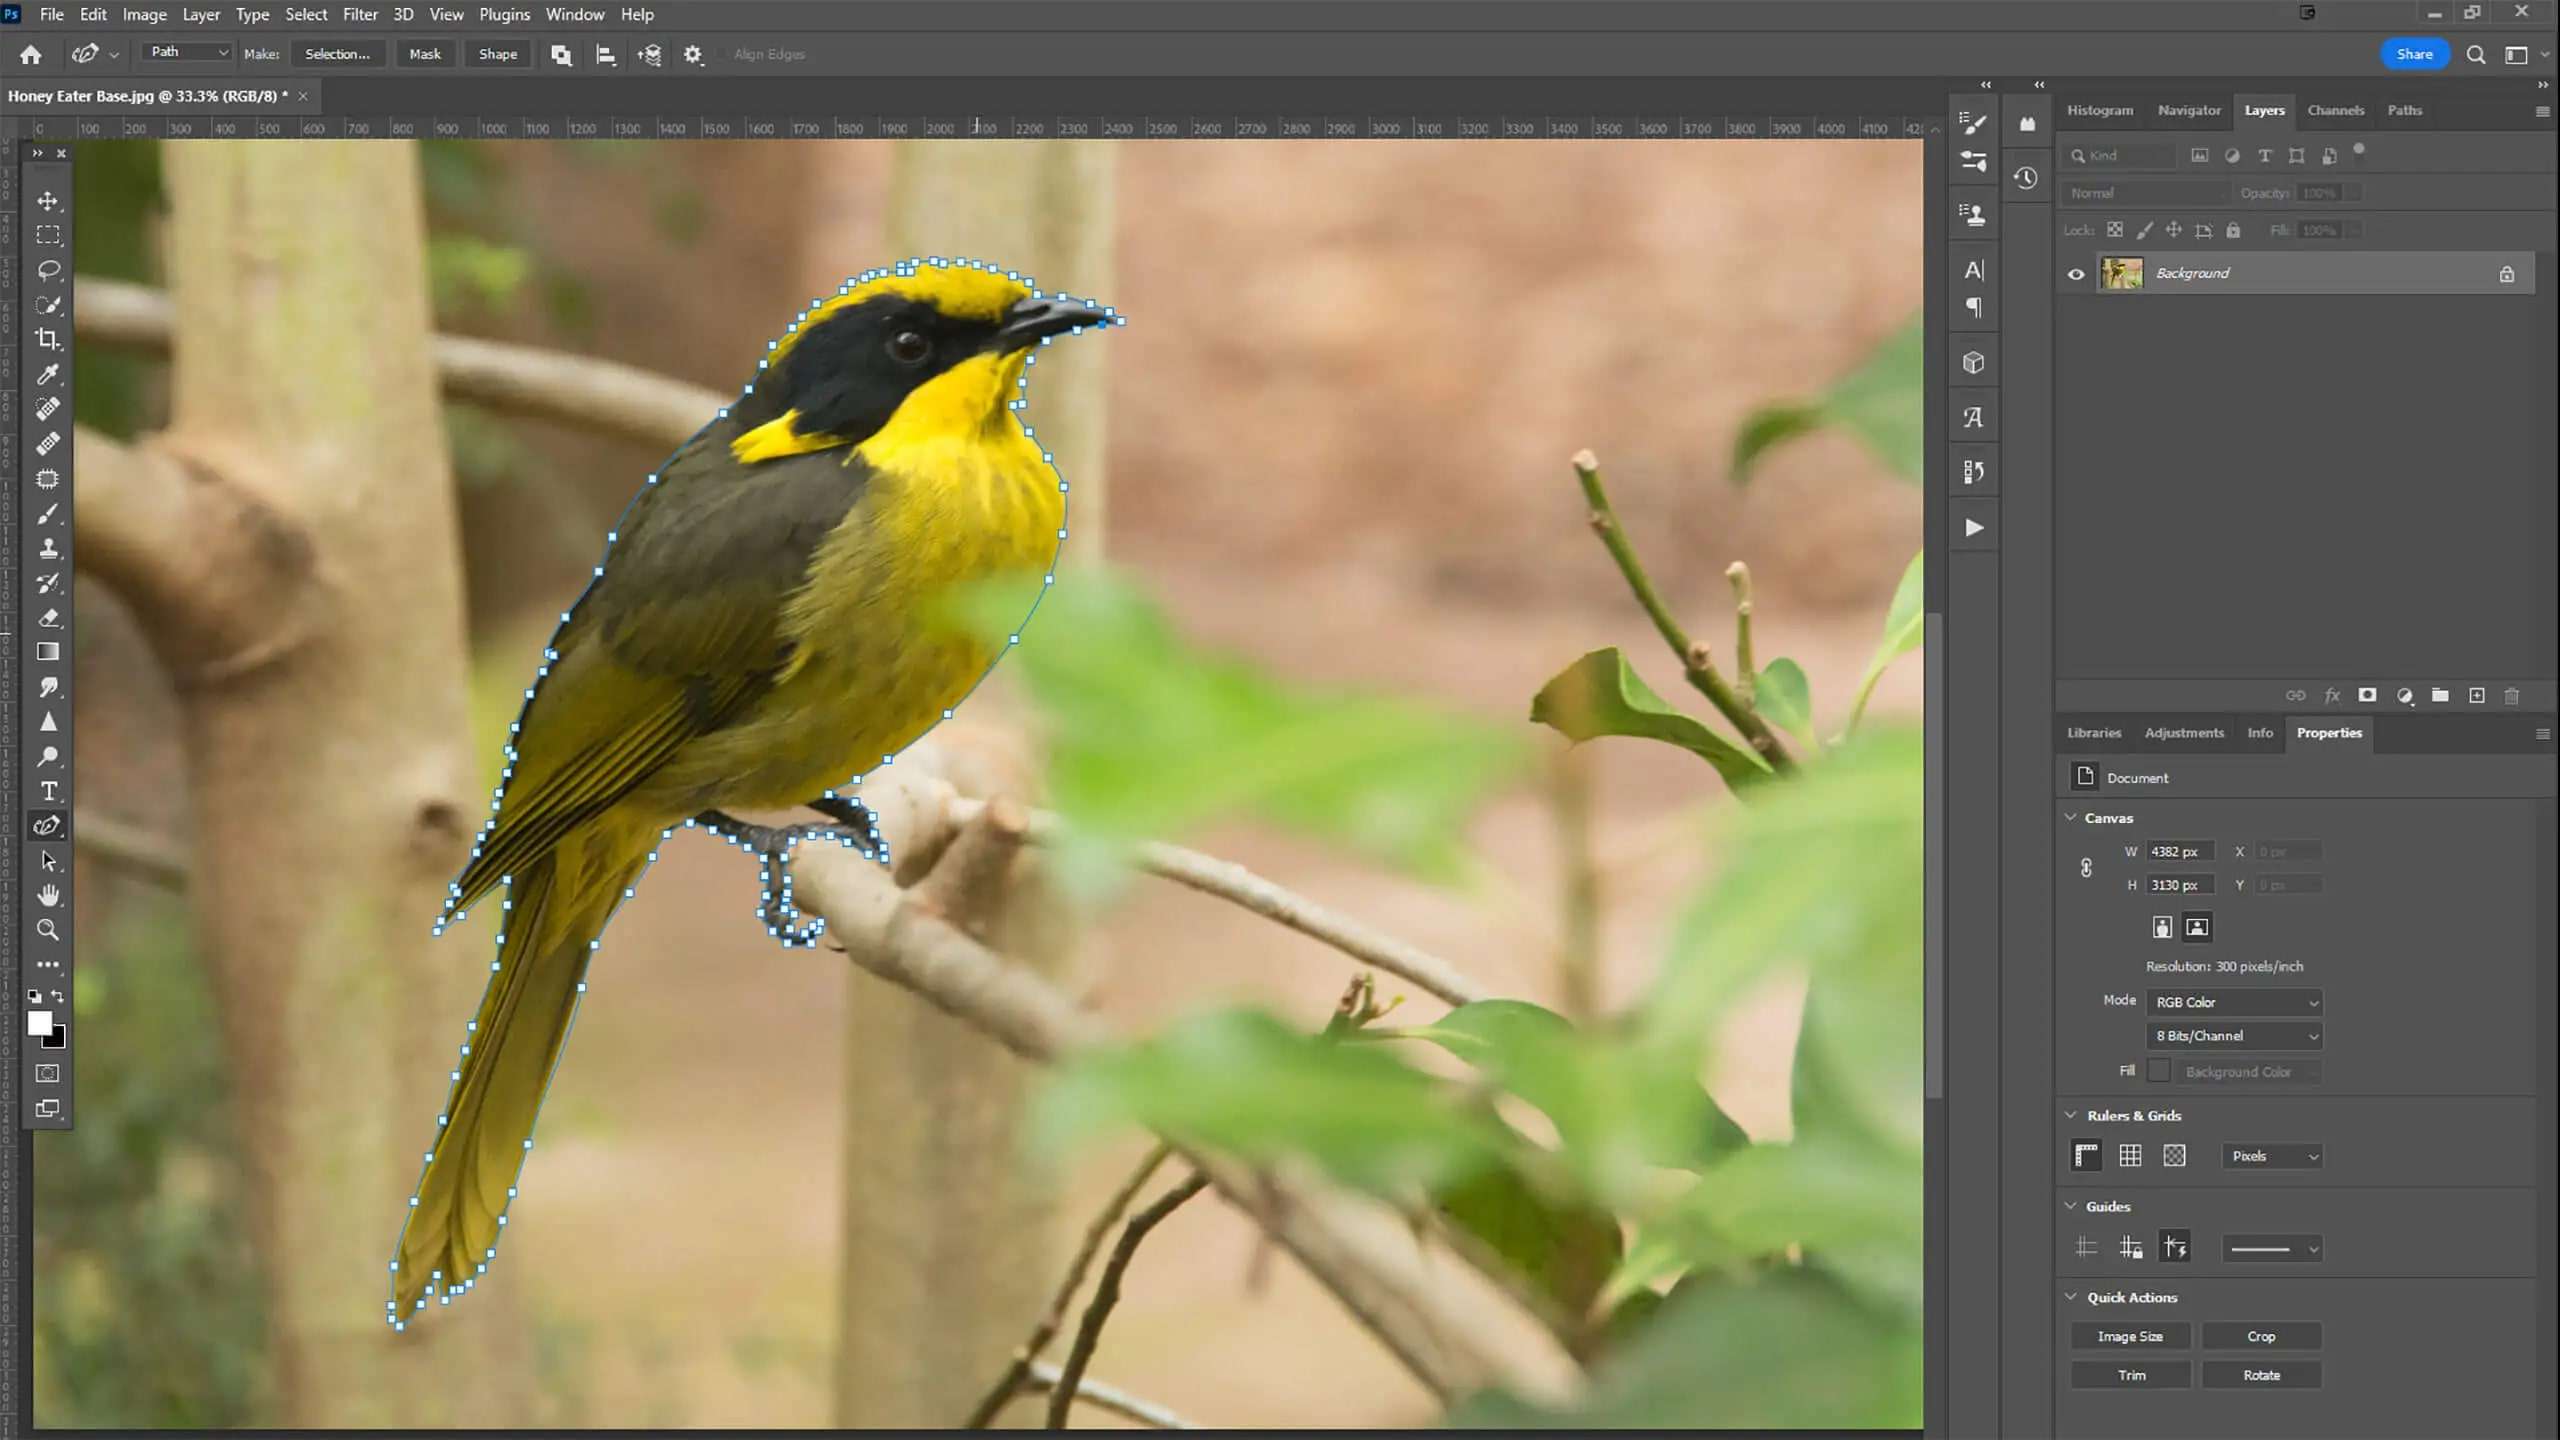
The Pen method is old. Photographers have relied on it ever since they first started using Photoshop, and many still do. Why? Isn’t the Pen Tool freehand drawing? True, this method is very far from the AI-based object selection.
You probably want to know, will you be able to use it as a beginner? The answer is yes, only not on your first try. The Pen is a fundamental feature you should learn to control if you continue using Photoshop for future projects. Why not start now?
Here’s how to use the Pen to remove the background from the image in Photoshop. Remember that you should use the Pen intuitively, so this is only a short introduction to help you get started with this Photoshop basic. Mastering the Pen will take time.
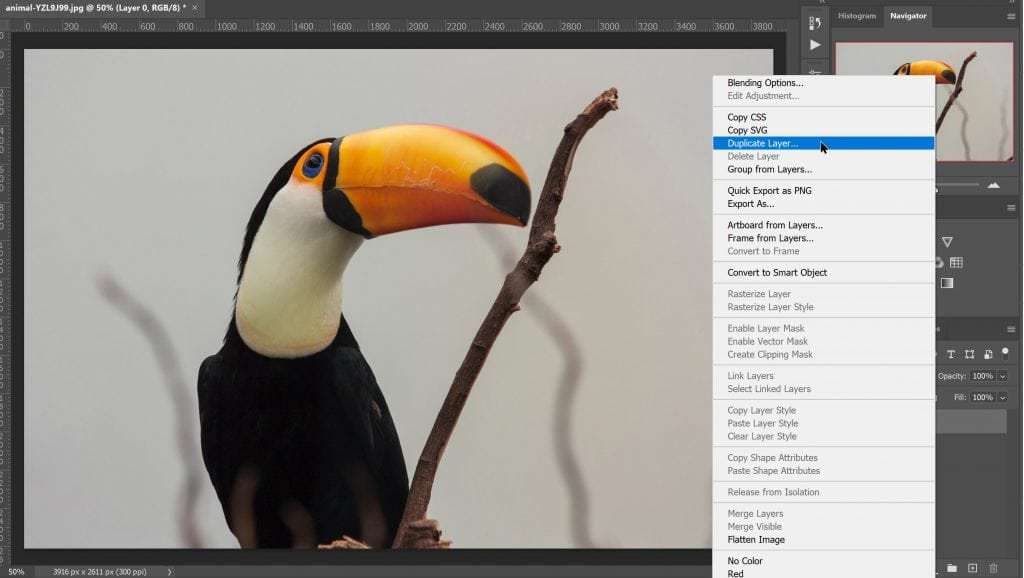
- Step 1: After opening your image in Photoshop, you must duplicate the image layer first. You can do that by right-clicking the layer in the layer control section and selecting Duplicate Layer.
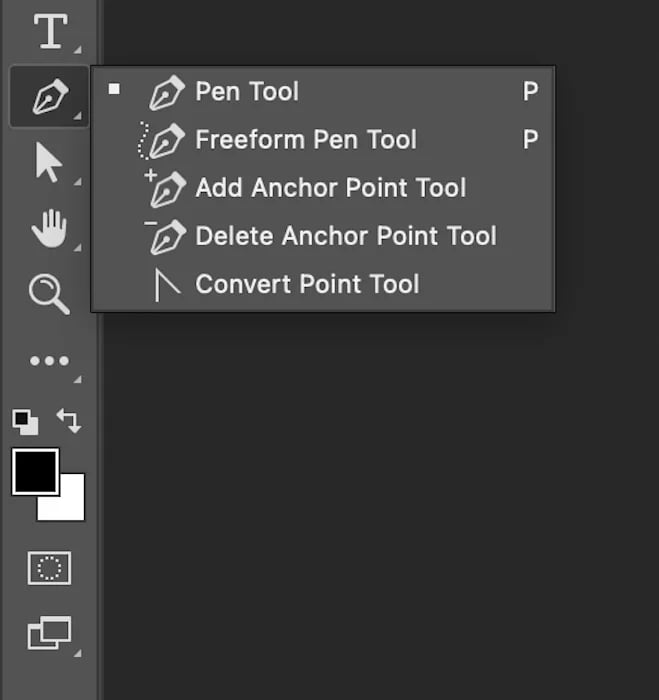
- Step 2: Choose the Pen Tool from the Photoshop Toolbox on the left and draw a path along the edges of the object in your photograph. Learning to control the curve is a trial-and-error process. You might want to see a few tutorials on how to do it right.
- Step 3: Click your first anchor point to finish the path and close the section. A small circle will appear next to your cursor. Click it to close and save the path. You can access all current paths in Window > Paths.

- Step 4: If your path seems a bit rough on the edges, take some time to edit it.
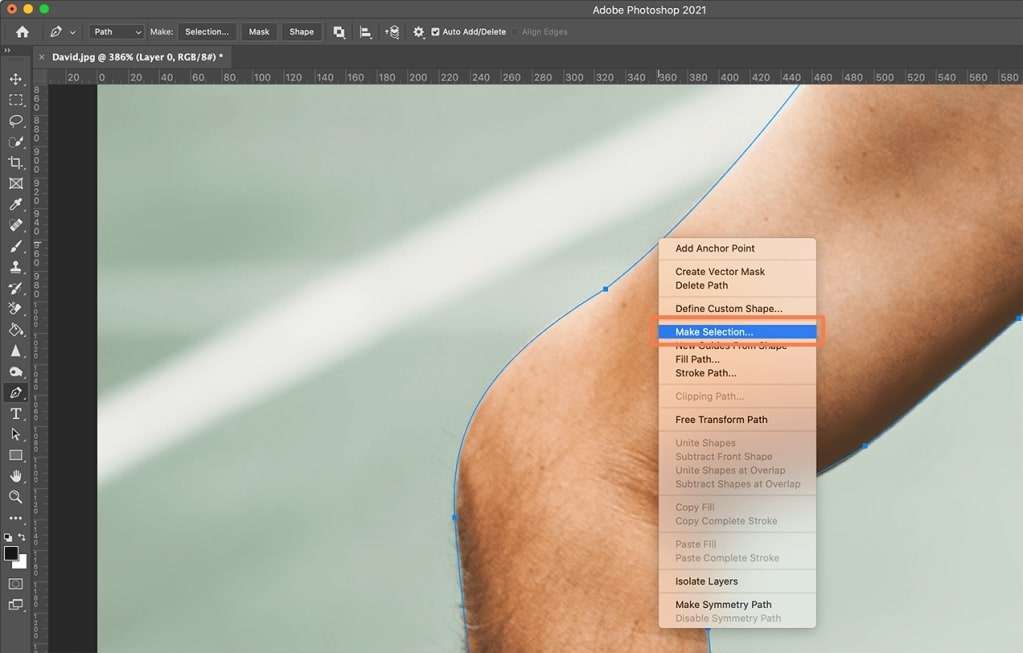
- Step 5: Return to the Paths panel. Right-click your new path and click Make Selection > OK.
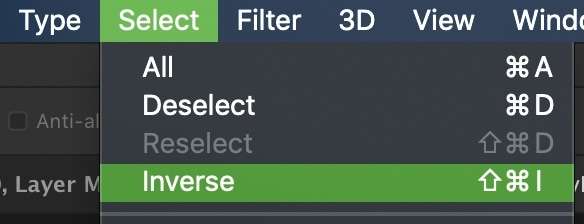
- Step 6: If your object is selected, find the Select > Inverse option in the Menu at the top of the screen. That should invert the selection from the object to the background.
- Step 7: Press the Delete key to remove the background from an image in Photoshop.
Method 5: How to Use Quick Selection to Remove a Background in Photoshop
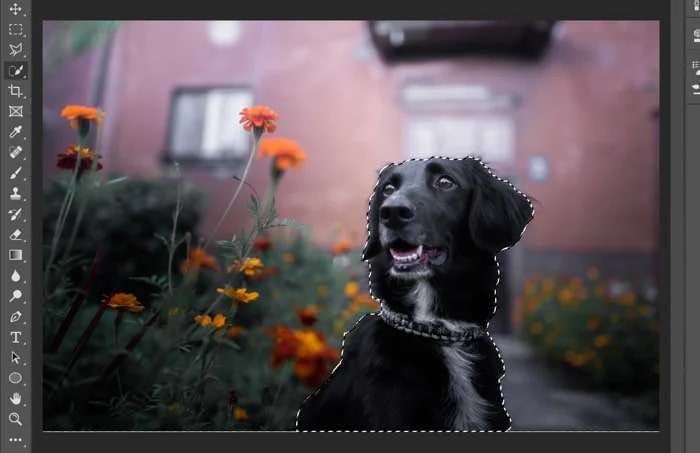
Is freehand drawing with the Pen in Photoshop too overwhelming for you? Then try the Quick Selection tool. Similarly to Object Selection, this tool uses AI to detect and select the edges of the objects in your photos, thus completing a big chunk of work.
If you are a beginner, you’ll find Quick Selection is a breeze to master. We’ve already walked you through most steps, like duplicating a layer and saving the selection.
So, let’s jump right into it. Here’s how the Quick Selection Tool works:
- Step 1: First, open your image and create a duplicate layer by right-clicking the image layer and clicking Duplicate Layer > OK.
- Step 2: In the Photoshop Toolbox on the left, select Object Selection > Quick Selection Tool.
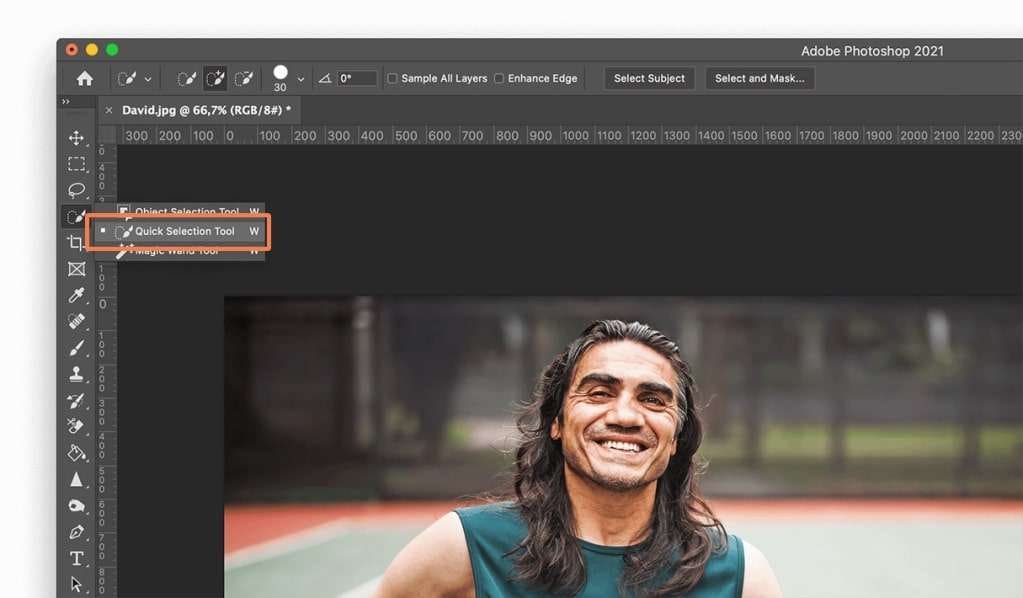
- Step 3: Return to your photograph and select the desired object with the Object Selection brush. You can readjust the brush size using the [ and ] keys.
- Step 4: Once you select the entire object, go to Select and click Save Selection.
- Step 5: Go to Select > Inverse. After Photoshop moves the selection from the objects to the background, click the Delete key.
Bonus Part: How to Use Booth.ai to Change the Background

Are you feeling disheartened yet? Don’t be. Nobody ever said Photoshop was easy, but try to find comfort in the fact that 90% of the world’s creative professionals use it for their projects. You know, every professional used to be a beginner, just like you.
Whether or not you should pursue other ways to edit your photographs depends on why you need to edit them in the first place. If you’re studying to be a photographer, you won’t get anywhere without Photoshop skills. Otherwise, you should try Booth.ai.
Booth.ai is a convenient online tool that helps self-sufficient and budget-conscious entrepreneurs and marketers create professional photos in a few steps.
While Booth.ai can’t help you erase the background from your photograph, it can generate stunning images you can post, print, or publish with zero editing.
Also, Booth.ai allows you to change the background altogether.
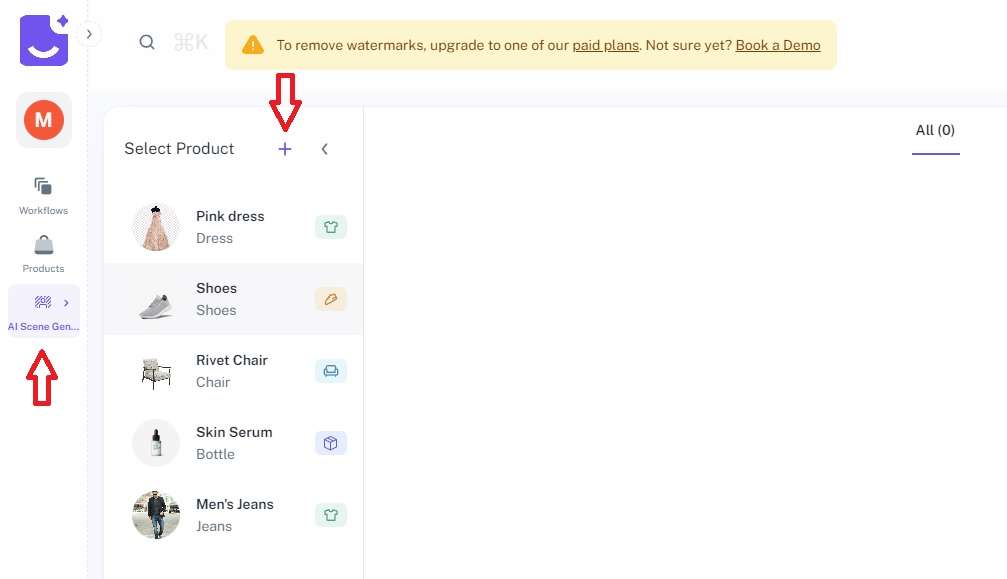
The option to generate a background just as you’ve envisioned it is one of the basic functionalities of Booth.ai. AI Scene Generator and the Scene Change feature allow you to put your objects in virtually any setting—from lifestyle backgrounds to studio backdrops.
Here’s how to create and change backgrounds with Booth.ai:
- Step 1: Go to Booth.ai and select Get Started.

- Step 2: Click the + icon to select a new product. At this step, you can take a smartphone photo of your object and upload it to Booth.ai. The AI will generate a new image around it.
- Step 3: Find Create Workflow and choose Product scene change, Fashion scene change, or Furniture scene change, depending on your desired setting.

- Step 4: The only thing left to do is fill out the boxes and complete the prompt to AI. Here’s an example. Under “I want to see my product,” you can write “on a sun-kissed beach in the Caribbean.” Booth.ai lets you choose your preferred lighting, time of day, and camera angle.
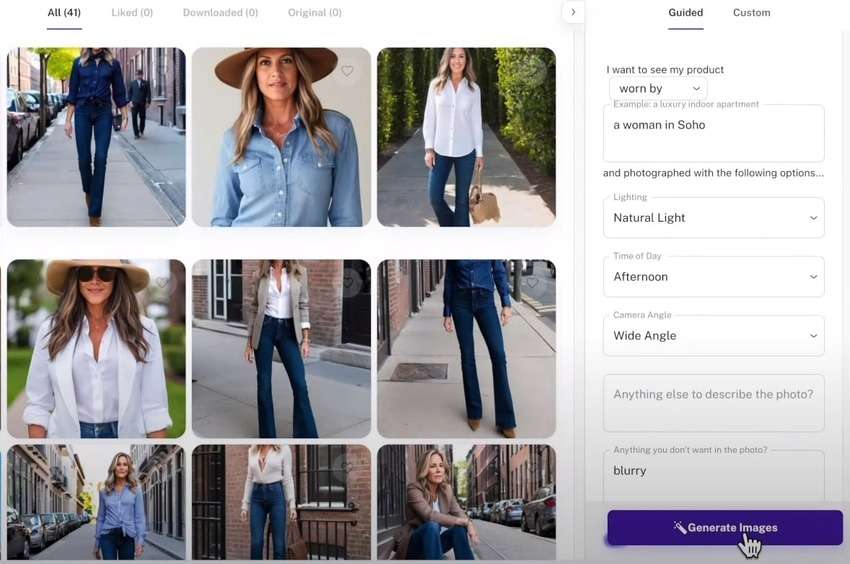
- Step 5: When you’re done, click Generate Images and give Booth.AI a few moments to do that. The images you receive will be ready for use, with no editing required.
What makes it better than Photoshop? Booth.ai is a fantastic alternative to popular editing software if you’re rushing to meet a product launch deadline, can’t afford a professional photographer, or don’t want to spend hours removing a single background.
Conclusion
On average, a beginner needs about three months to become comfortable with Photoshop. If you’re looking forward to a career in photography, that’s not a lot. However, if you can’t wait for that long, Booth.ai can provide a perfect background right now.
